

INSTALLATION
TROUBLESHOOTING
Fuser without Second Monitor
Manual how to use Fuser without Second Monitor for DMA Cheats through TeamViewer.
You can buy our Fuser here — https://www.dma-cheats.com/fuser
Guide how to set up HDMI Fuser is located in the folder DMA Cheats


DOWNLOAD
Recommended Hardware
Recommended HDMI cable — HDMI 2.1 cable
Recommended DisplayPort cable — DP 1.4 cable
Your Second PC or Laptop should have at least 1 free HDMI port.
If you don't have a Second PC we recommend — Mini PC
Recommended OS — Windows 10 or 11
Setup instructions
For this method, you will need 2 computers (Main and Second PC one), 1 monitor and a Fuser.
1. Connect your Monitor to your Second PC and turn on your Second PC (Main PC should be turned off at this stage).
2. Open Display settings on your Second PC.

3. Set the scale to 100%.

4. Select the desired resolution (your Fuser must support this resolution).

5. Select the desired refresh rate (your Fuser must support this refresh rate). For example, I set 2560x1440 144 hz.

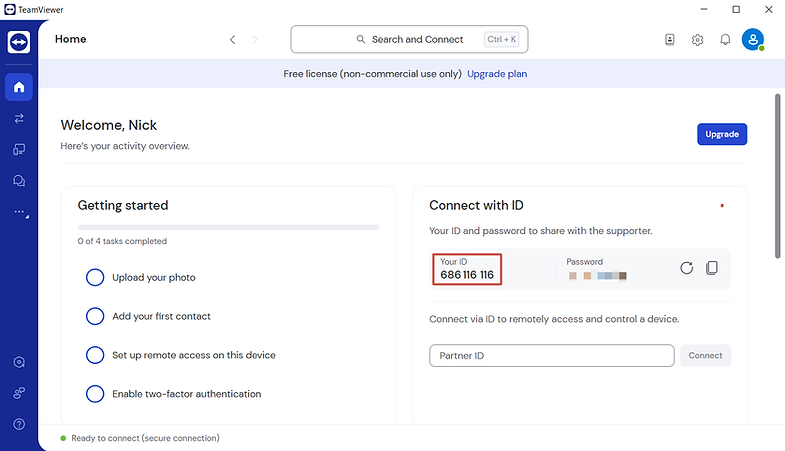
6. Download and run TeamViewer on your Second PC. Register or log in (required). Save your ID (for example, take a photo on your phone. You will need this ID every time you want to run a cheat).
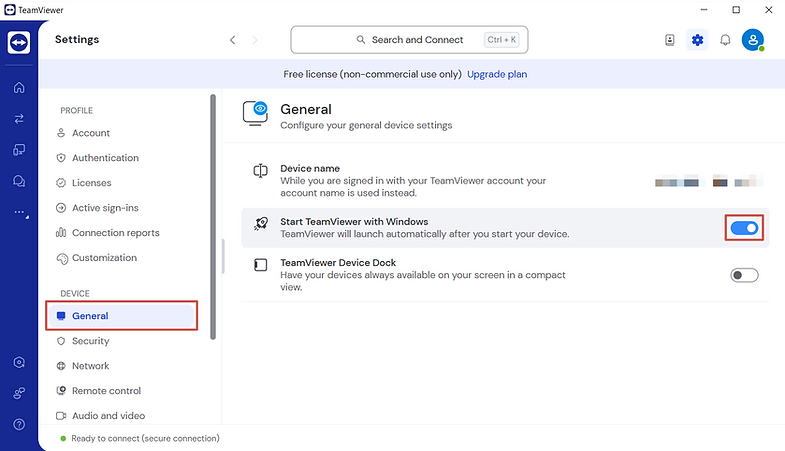
7. Click on the Gear icon. Go to General section and enable "Start TeamViewer with Windows".
8. Scroll down the left column and select Advanced settings. Then click Open advanced settings.

9. Scroll down a bit to the Personal password section. Create and remember a password (this will be your permament password to connect to TeamViewer). Then click OK.

10. This completes the setup of the Second PC. Now, every time you turn it on, TeamViewer will automatically start. The connection ID will always be the same, and the password will be the one you created. That means you no longer have to connect the monitor to the Second PC.
Now you can disconnect the monitor, but don't turn off the PC and don't close TeamViewer.
11. Connect the Fuser according to the picture below (if you have different Fuser, then use the schema for your model). Connect the power supply and turn on the Fuser using the power button.
Note that the Monitor is connected to the Fuser using a DisplayPort cable.
And the Main and Second PCs are connected to the Fuser using HDMI cables.
As a result, your only Monitor will be connected to Fuser only. And no Monitors will be connected to the Main or Second PCs.

12. Turn on your Main PC.
13. Press the button with desired resolution and refresh rate on remote control. Your Fuser and Monitor must support this value. For example, I have 2560x1440 165 hz Monitor and DP Fuser, so I press 2k144. The screen may turn black for 30 seconds, wait for it to turn on.

The next eight steps (14—21) are optional but highly recommended. They disguise your Fuser as your real Monitor protecting it from detection.
14*. Press EDID button on the remote control. The screen will go off for about 30 seconds. Wait until it turns on again.
15*. If after that your monitor haven't been set to the maximum screen resolution and refresh rate (for example, my monitor automatically set 2560x1440 60 hz and I could select maximum 120 hz in Display Settings, but there is no 144 hz option), then open NVIDIA control panel (I don't have instructions for AMD graphics cards, but most likely there is a similar process).

16*. Go to the Change resolution section and click Customize.

17*. Put a check mark on "Enable resolutions not exposed by the display" and click Create custom resolution.

18*. Enter the desired resolution and refresh rate supported by your Monitor and Fuser. For example, I enter 2560x1440 144 hz.
And click Test.

19*. The display may go black for a few seconds. Once it turns back on, make sure there are no artifacts on the screen and click "Yes" to save new resolution.

20*. Then Right-click on the desktop, open Display settings > scroll down and go to Advanced display settings > Display adapter properties for Display 1 > Monitor > Screen refresh rate.
And set the previously selected screen refresh rate. For example, I select 144 hz.

21*. Open TeamViewer on your Main PC (you can also open it on your phone/tablet/laptop if you want to keep your Main PC completely clean) and connect to your Second PC using data which you saved earlier.
Repeat steps 14—21 on your Second PC using remote control application. Set the same resolution and refresh rate using NVIDIA Control Panel (or an analog from AMD) and Display Settings. For example, I set 2560x1440 144 hz.

22. To verify that the EDID was successfully applied, open Display Settings on your Main PC > Advanced Display Settings. If the name of your real monitor appears there, it means everything worked correctly.

If, for any reason, EDID setup didn't work, then you will see some random name instead of the name your real Monitor. Some anti-cheats may detect Fuser without EDID setup so it's highly recommended to do it.

23. Run a game you are going to play on your Main PC.
24. Run DMA cheat on your Second PC using TeamViewer.
25. When the game and the cheat are running, press the Fusion button on the remote control or on the Fuser itself to broadcast the cheat from the Second PC to the Main one.
Use TeamViewer to configure the cheat.

If after completing all the points Fuser doesn't work for you, watch the video below and read the troubleshooting.
Video Manual
Main Monitor doesn't work
If the main PC just shows a black screen and shows no signs of life, make sure that:
-
You have connected the DisplayPort and HDMI cables correctly
-
No other DP or HDMI cables are connected to the main monitor
-
The Fuser is plugged into an outlet and turned on using the red button
-
You selected the resolution and refresh rate supported by Fuser on the Second Monitor and pressed the button with the corresponding parameters on the Fuser remote control
If none of the above helped. Disconnect all cables and start following the instructions from the beginning
Monitors aren't working properly
If an image with an incorrect resolution or refresh rate is displayed on the main monitor, make sure that:
-
You're using the resolution and refresh rate supported by Fuser and have set it to me on both monitors
-
In the section Display settings on the Second PC you selected Duplicate these displays
No supported resolution
If Fuser doesn't support your resolution or screen refresh rate, then lower them to the closest values that are supported.
For example, if your monitor specs are 4K120hz, downgrade to 4K60hz or 2K144hz.
Note that this resolution and refresh rate must be supported by your monitor.
Remote control doesn't work
Make sure you installed CR2025 battery into the remote control.

Where to download?
You can download DMA Cheats folder here — https://www.dma-cheats.com/download
